Tuesday, March 3, 2020

I stopped doing Stopmotion

Good morning to all my Vietnamese and Indian and British readers! Hopefully all is well with the corona virus but anyways I'd like to share with you my experiences with the film project last week! So after some research on stop motion I decided not to continue with the medium. There are a few main issues but the critical ones consists of software and time.

Image result for stop motion

Software

Once I decided to pursue stop motion I began researching software to use. In the past I had used apps like PicPac and Stop Motion Plus on the play store but for this project I was planning on using a DSLR camera. So I started looking into apps on the Windows platform. I came across a few free softwares like MonkeyJam and HeliumFrog but none of them included support for a DSLR camera as an external camera. What does this mean? Either I'd have to use the computer webcam as the camera which was definitely not an option for this project, or I'd have to invest in a dedicated external webcam. The most popular software that did support DSLR's however, was DragonFrame which would cost upwards of $200. 

Time

Another issue with stop motion is the time it would take to create such a film. Initially I was planning on shooting at 12 frames per second but further research allowed me to realize that 24 frames would be much more ideal. And to shoot a 2 minute opening at 24 frames per second would mean at least 2880 pictures to take. And after talking to my peers and advisors I realized that such a project would have required planning from since first semester. So after considering all this I've decided I'll continue with a live action film opening instead of stop motion.

Monday, March 2, 2020

Change

Good afternoon, film freaks! So over this weekend, I had a realization. A realization that would be unacceptable if it occurred later in production. Because what I realized was that I might need to redo the plot for the film opening. I still want to stay within the thriller comedy genre but the current plot I have drawn out in the storyboard has a number of problems.

First, the number of actors. Not only do I have a limited budget, but I have a limited timeframe to complete the project as well. Having a higher number of actors would cause the project to reach many delays through schedule changes, wardrobe changes, and the time on set would be greatly reduced as many of the potential actors around me are highly unmotivated. They would easily get frustrated after the first few takes and ask to leave home so I'd have to practice filming the shots beforehand before traveling onto the location to film the actors.

Another issue is the location itself. Shooting outdoors can allow the capture of often beautiful scenery but comes with unpredictable weather and almost continuously changing lighting. Moreover, a scene set purely in sunset would not allow much time for retakes and adjustments as the sun would eventually . . . well . . . set. Filming indoors would allow me to have much greater control over the lighting and set design as well as actually being able to see the LCD monitor on the camera.

This morning I had a new idea to help solve some of these issues. Stop motion. This medium allows for often much greater freedom in action sequences and the actors would be Lego mini-figures who wouldn't complain about an absence of food or the long filming hours like normal ungrateful actors would. However, to shoot a film at 24 frames per second would actually require 24 different pictures of slightly different positions of the figures just to produce one second of film. However, I'm still looking into this medium as an option so stay tuned for some tips and tricks on stop motion!

Image result for lego stop motion

Friday, February 28, 2020

Handcuffs

Good evening everyone! So over the past week I've been wrapping a lot of things up with the first stage of production. We've finished location scouting, I've almost finished compiling a list of actors, and I even obtained permission from a friend to use his airsoft firearm for filming. The only issue with it is that it has a bright orange tip which may need to be covered with black electrical tape or removed completely. (Removing the tip is a one way process as the tip needs to be cut out). As for the handcuffs, I managed to talk to Roy. In fact, the story of how I found out Roy has handcuffs is quite interesting. So if you guys have some time to spare . . .

It was a fine shiny morning at Cypress Bay High School, one of the largest high school campuses in the United States. I was on my way to my usual 5th period class, AICE English Literature, when I found my peers waiting outside. We were locked out of the room for a good 20 minutes until security sent in a backup sub and let us inside the room. The chatter filled the room as the teacher was still not here and she left us with no assignments to complete. Until we heard it. The code red alarm. Fast forward approximately 4 hours of cramped sitting positions in the dark and the armed police personnel had finally reached our room (Like I said it is a large school, so it took a displeasing amount of time to check every single room for weapons in every single student's backpack). So they began checking our bags until they came across Roy. And the police officers stared at each other when the pulled out that strange item—the fake handcuffs. "Someone's feeling kinky," the officer said. And that's how I knew Roy had handcuffs.

This week I asked if I could borrow his handcuffs. He said yes. I asked him whether he had real ones too. He said yes. I asked him why he even has handcuffs in the first place . . . and he said yes without compromising a single detail.

Meanwhile, I've also been focusing on camera technique recently. Since I'm an extremely low budget filmaker, I have to make the absolute most out of the little resources I have and substitiute them for the equipment that I don't have access too. For example, a camera slider. These devices can usually cost upwards of $100 and I simply do not have the budget to include one. However, a quick Youtube search allowed me to find the "towel technique". Essentially, the towel is placed on a smooth surface with the camera on top of it. Then the towel is dragged, carrying the camera along with it producing a makeshift tracking shot. And there's been some other experimentation but we'll get there soon.
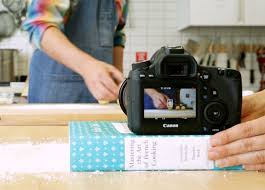
Image result for camera towel slider

Wednesday, February 26, 2020

Location Scouting

Good morning everyone! As promised here's my post on my location scouting adventures. So it was a nice sunny morning and I actually hadn't planned prior to that morning to drive around South Florida. I started up my Jetta and placed my camera bag underneath the front seat to prevent it from sliding around. In the backseat I had my favorite coat just in case it got a bit chilly (it didn't). I picked my friend Vivek to serve as a subject so I could frame my shots but unfortunately he decided to stay inside the car for the majority of the time. He did, however, aid me tremendously in discovering new potential locations to film an illicit business exchange. Posted below are some of the pictures from our excursion


The first three pictures above are from my favorite location (also pictured below). I really loved how the power lines from leading lines in the frame which would allow for the viewer to quickly focus into the center of the action. The road follows with their direction centered between the lines which would add to the symmetry of the shot if it becomes necessary to include a powerful centered perpendicular to the road—perhaps to display the aftermath of the crime. The rest of the pictures incorporated more of an industrial setting or in the case of the road an isolated simple setting to better develop the contrast between the subjects and the background. 


As per my friend's suggestion I have been looking into creating a rough runthrough of the film opening with local locations to better develop an idea of how long the film opening comes out to and to plan the blocking of props and actors.

Sunday, February 23, 2020

Production Schedule

This weekend has been QUITE eventful in terms of progress in my film production. But what I want to focus on now is the production schedule from this date on. The submission is due on April 5 which gives me 6 weeks from today to finish the opening, documenting the opening and my experiences creating it, and of course the post-production breakdown of the project. So I've compiled a rough production schedule by breaking down my goals for each week on what I want to have completed. (I'll also be starting at week 3 since I've already been working on my research and planning for two weeks.)

Image result for production film

SCHEDULE

Week 3

  • complete location scouting
  • compile list of actors and their availability
  • plan out costume design for actors
  • Possibly obtain prop firearm after assessing feasibility of using one in the film

Week 4

  • Obtain permission from the library to use a study room to film
  • Write the script
  • ask Roy if I can borrow his handcuffs
  • Continue improving technique for holding and moving camera to produce smoother shots
  • Begin gathering music and obtaining permission if necessary

Week 5

  • Confirm filming date with actors and review their individual wardrobes to see if changes need to be made
  • Create shotlist so that it is easier to review progress on set
  • Shoot interview scene (final scene) if library gives permission OR investigate alternative locations and film scene
  • Film rest of the movie


Week 6

  • Review footage if reshoots are necessary
  • Schedule dates with actors to record voices
  • Watch this one hour video on color grading https://youtu.be/gPZ4-CF_osk
  • Color grade the clips

Week 7

  • Complete editing
  • Deliver post-production feedback and begin work on CCS


Week 8

  • finish EVERYTHING
  • submit


Saturday, February 22, 2020

Storyboard

After testing out the new equipment and location scouting I had a large enough perspective to begin work on the storyboard. And my mother's banana flower vada really helped boost my creative juices this afternoon. But anyways back to the storyboard . . . I didn't have much difficulty creating it since I had a solid idea of the plot and how to frame and transition through the different shots. And I didn't stress too much on the artistic impression of the individual characters and objects because in the end it's going to be the film opening that makes it on to the big screen (or projector) not the storyboard. However, the storyboard does show a detailed outline on the progression of the film and how to frame each scene. There may still be possibility for minor changes but for now you can feel free to click the shared link below and view the document.

My mother's vazhaipoo vada

Storyboard Link:

https://drive.google.com/file/d/1G_dbElzBI2WpNXpo0VQcMgArncmDw65V/view?usp=sharing

Progress!

That's right . . . progress! So last night turned into something quite beneficial. I was on my way to my girlfriend's house since I had to drop her off back at home and because I had to sign some forms if I wanted to go to her school's prom with her. Once we reached her house she disappeared for a few minutes to gather some documentation while I fell into that meditative state where I analyze the different options I have to proceed with my film project. Her dad and I started to have a conversation when I remembered that he too had a profound interest in film.

The Tripod

We actually dropped into quite a deep conversation—Senthil Uncle and I. It began when we were confronted with that awkward silence. The type of silence where both of us knew how weird it was that I was even allowed inside the house when just a few months ago Amutha Aunty was crying that her daughter had been spoiled by a sly charming boy (yes that's me) into having a boyfriend. Yet I digress. Anyways that's when I asked him, "So what do you know about tripods?" To my surprise, he actually sparked into intense interest. He obtained all the details of my film from me, from the course which required its submission to my entire history of making movies, to who would be acting in the film. Although the language barrier caused some confusion over what I was trying to create, an affirming nod assured me that he approved of my ideas. He then proceeded to offer me a tripod! But being the particular person I am, I asked if it was a fluid head tripod. And BINGO! It sure was a fluid head tripod :)

Senthil Uncle's Targus TGP60T fuild head tripod


The Microphone

Now I'll be perfectly honest I hadn't even thought of looking into audio equipment for the film. I was simply planning to deal with it on set. But after my experiences with recording through the camera's microphone, I realized that I seriously did need the microphone Senthil Uncle offered me. And similar to the tripod he offered his Blue Yeti USB microphone during our conversation about lavalier mics. We were discussing the practicality of using the discreet clip-on mics but he insisted that I add the voices in post-production instead. I was seriously skeptical about "dubbing" the audio but this morning I filmed a test scene where I reminisced on the difficulties of life with plenty of mumbling to create a challenge for syncing the voiceovers. However, when it actually came to it, the software I used (Wondershare Filmora) played back the audio into my headphones while I recorded the voice, allowing me to easily sync up the audio. I previewed the edited clip to my dad and to my surprise he was unable to realize that the voice was added in post-production. Maybe the months of awkward conversations with my girlfriend's dad were worth it after all.
Blue Yeti USB microphone


Location Scouting

Now for this I actually have a separate post I'll be sharing soon with all the pictures I obtained in my searching. Overall I found that I needed a road with less traffic so that I can portray the secluded environment that my film would take place in. I took along a friend who knew South Florida relatively well to help me look for different locations around and just outside of Weston to film without legal issues.
More pictures coming soon!

Friday, February 21, 2020

Equipment

So recently I've been looking into the type of equipment I'd need to use for this film opening. On top of the list is a decent tripod. Tripods come with many different kinds of heads which I've researched below to find the best solution for my film project.

pan-tilt-head

Pan and Tilt

fluid-headThe pan and tilt head is the most common type of head found in cheaper tripods, such as the lightweight ones you can pick up at a Walmart. They offer the ability to make adjustments on two axes and are traditionally better for photography as the camera is in a fixed position. The dials provide for friction adjustment but the result is often jarred pans and tilts due to stick slip effect. 


Fluid Head

ball-headFluid heads are the most common type of tripod heads used by cinematographers. Instead of using friction to guide the position of the camera, the head includes a fluid chamber inside to dampen the otherwise jerky motion a pan and tilt tripod head would typically provide. However, due to the fluid design, entry-level fluid heads can set you back at least $70. Tripods that advertise a "fluid motion" or "oil fluid" for significantly cheaper prices are often falsely marketing their products as a fluid head and don't provide the expected smooth pans or tilts an actual fluid head would provide.

Ball Head

Ball head tripod mounts aren't typically used for filming but they can be used to quickly adjust for a fixed frame shot. The freedom of movement allows for more angles to position the camera and the knob at the end allows you to adjust the friction in the joint. However, because the ball is allowed to move freely when loose, the camera cannot maintain itself on a fixed axis when using pans or tilts.


After researching all the tripods available, I decided that a fluid head would be best not only in terms of smooth camera movement but also in terms of resources since my school allows for the loaning of equipment which includes pan and tilt tripods. So now I just need to finish analyzing reviews for different tripods before settling on the best one for this project.

Sunday, February 16, 2020

Thriller Comedy Samples


After deciding on creating a thriller comedy piece, I researched existing thriller comedy productions to evaluate what openings worked well to start off their films. Three of these films include The Pink Panther, Parasite, and Knives Out.

Parasite (2019)

Image result for parasite 2019

Parasite uses a similar opening scene to Pink Panther in the sense that it introduces the characters and the credits. However, in this case, the intro is not an animation sequence that follows a different timeline than the real story; instead, it starts off the main plot while introducing the characters in live-action one at a time until the interactions between the characters grow noticeable. The thriller elements are absent but the search for the wifi allows the audience to relate to the comedic situation.

Knives Out

Image result for knives out

One of the more recent thriller comedies, Knives Out utilizes its opening differently from the other two films researched. Instead of using comedic elements the intro focuses more on the setting of the production as it plays a pivotal role for the movie's plotline. The characters are not necessarily introduced with their actions taking more notice than their faces and personalities. The gruesome murder of the man marks the beginning of the transition into a scene more focused on character development like the other two films.

The Pink Panther (2006)

Image result for the pink panther 2006

The Pink Panther's opening serves two purposes: to introduce the characters and to display the credits. And a third more subtle motive is to discreetly introduce the plot. Instead of using the live action characters that the majority of the film uses, the opening uses animated characters of both the inspector and an abstract animation of the pink panther. Although the pink panther refers to a prized jewel, the use of an actual animated panther represents the lucrative and elusive nature of the artifact.

Intro

Welcome all, you can call me Mehul, and I'll be sharing with you documentations of my findings on the internet! Please know that none ...